Isaac Sim Tutorial 6. ROS2 Joint Control
Isaac Sim에서 Franka Panda의 joint state를 ROS2로 publish하고 joint command를 subscribe해 관절을 제어하는 흐름을 정리한다.
이 글은 ROS2 Publish Rate and QoS에 이어서, Isaac Sim에서 robot articulation을 ROS2 joint command로 움직이는 과정을 정리합니다.
이번 예제의 대상은 Franka Panda robot입니다. Isaac Sim은 /joint_states로 현재 관절 상태를 publish하고, 외부 ROS2 node가 /joint_command로 보낸 명령을 subscribe해서 Articulation Controller로 전달합니다.
참고한 자료는 아래와 같습니다.
1. Franka Panda 추가
Isaac Sim Content Browser에서 Franka Panda USD를 stage에 추가합니다.
1
Isaac Sim > Robots > FrankaRobotics > FrankaPanda > franka.usd
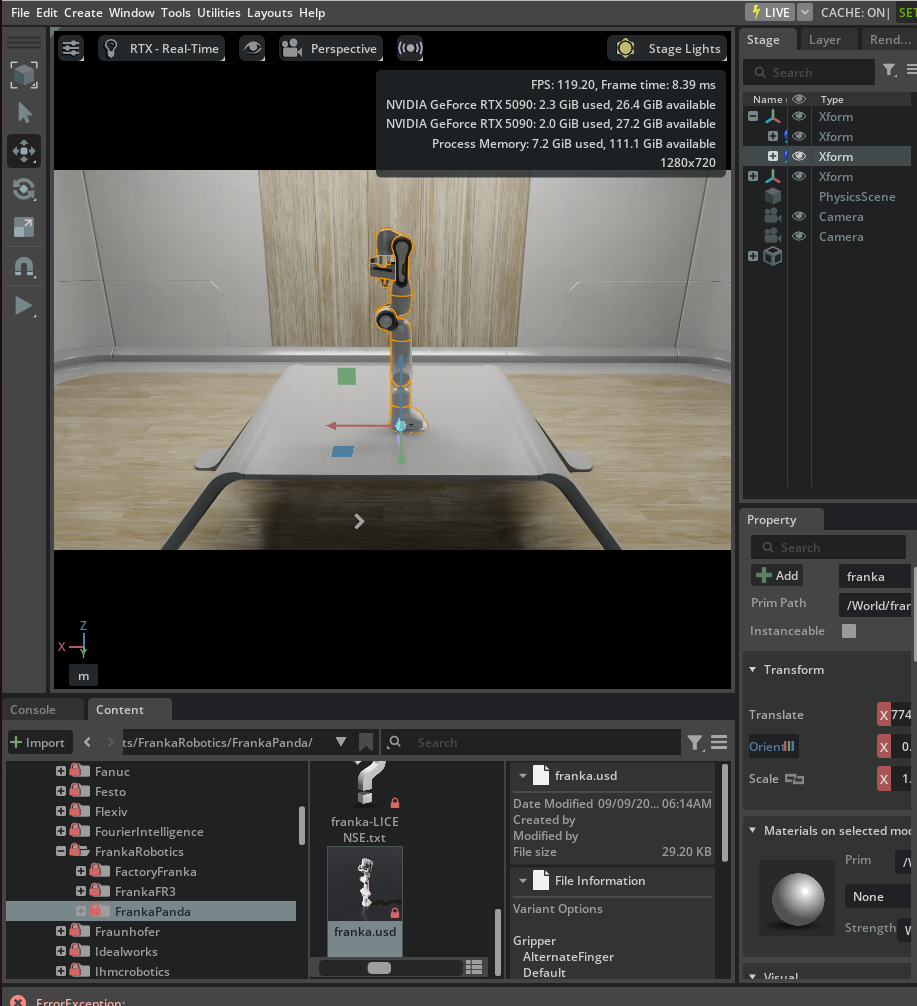
stage에 올라온 robot prim 이름은 환경에 따라 /franka 또는 /panda처럼 다를 수 있습니다. 이후 node의 target prim을 설정할 때는 실제 stage에 있는 articulation root prim을 선택하면 됩니다.
이 글에서는 TurtleBot처럼 mobile base를 움직이는 대신, manipulator의 joint state와 joint command를 ROS2 topic으로 연결하는 흐름을 봅니다.
2. Joint State Action Graph 만들기
Window > Graph Editors > Action Graph에서 새 Action Graph를 만듭니다. graph에는 아래 노드들을 추가합니다.
| 노드 | 역할 |
|---|---|
| On Playback Tick | simulation frame마다 graph를 실행합니다. |
| Isaac Read Simulation Time | ROS2 message timestamp에 넣을 simulation time을 읽습니다. |
| ROS2 Publish Joint State | robot의 현재 joint state를 /joint_states topic으로 publish합니다. |
| ROS2 Subscribe Joint State | /joint_command topic에서 joint command를 받습니다. |
| Articulation Controller | subscribe한 joint command대로 robot articulation을 움직입니다. |
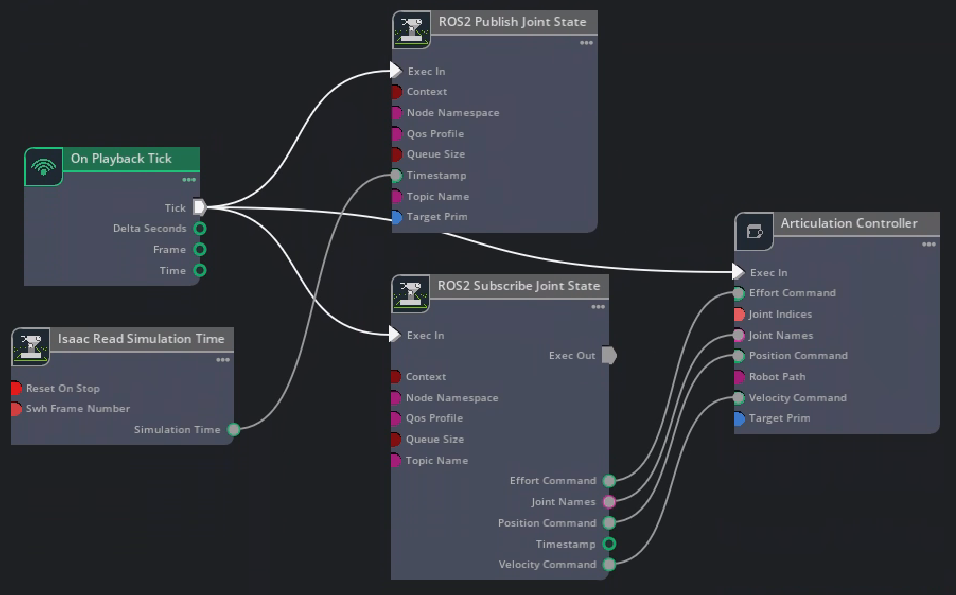
연결 흐름은 아래처럼 생각하면 됩니다.
1
2
3
4
5
6
7
On Playback Tick
  -> ROS2 Publish Joint State
  -> ROS2 Subscribe Joint State
  -> Articulation Controller

Isaac Read Simulation Time
  -> ROS2 Publish Joint State timestamp
여기서 publish 방향과 subscribe 방향을 구분하는 것이 중요합니다. /joint_states는 Isaac Sim에서 밖으로 나가는 topic이고, /joint_command는 외부 ROS2 node에서 Isaac Sim 안으로 들어오는 topic입니다.
3. Target Prim 설정
ROS2 Publish Joint State 노드의 target prim에는 articulation root API를 가진 Franka robot prim을 넣습니다. Tistory 예제에서는 /franka를 사용했고, NVIDIA 문서 예제에서는 /panda를 사용합니다.
Articulation Controller 노드도 같은 robot prim을 target으로 잡습니다. target prim을 다르게 잡으면 /joint_command를 받아도 실제 robot이 움직이지 않습니다.
핵심 topic은 다음과 같습니다.
/joint_states: Isaac Sim에서 publish하는 현재 joint 상태/joint_command: 외부 ROS2 node가 publish하는 joint command
target prim은 joint control에서 가장 자주 틀리는 부분입니다. graph가 정상이고 topic이 보여도 robot이 움직이지 않는다면, 먼저 articulation target이 실제 robot prim을 가리키는지 확인합니다.
4. ROS2 Tutorial Publisher 실행
ROS2 환경이 source된 터미널에서 Isaac Sim tutorial node를 실행합니다.
1
ros2 run isaac_tutorials ros2_publisher.py
이 node는 /joint_command로 joint command를 publish합니다. Isaac Sim의 ROS2 Subscribe Joint State 노드가 이 topic을 구독하고, Articulation Controller가 Franka 관절에 명령을 적용합니다.

5. Joint State 확인
robot arm이 움직이는 동안 다른 ROS2 터미널에서 /joint_states를 확인합니다.
1
ros2 topic echo /joint_states
정상적으로 연결되면 각 joint의 name, position, velocity, effort가 계속 publish됩니다.
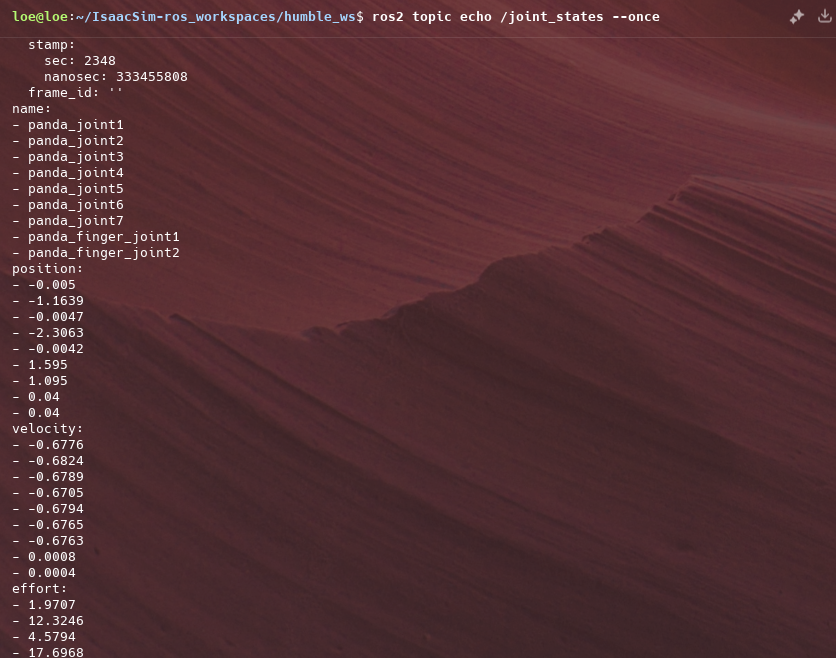
이때 /joint_states가 publish되는데 robot이 움직이지 않는다면 subscribe 쪽, 즉 /joint_command topic과 Articulation Controller 연결을 확인합니다. 반대로 robot은 움직이는데 state가 보이지 않으면 publish node target이나 timestamp 연결을 확인합니다.
6. 메뉴 Shortcut
공식 문서에는 graph shortcut도 있습니다. ROS2 bridge extension이 켜져 있다면 아래 메뉴에서 Joint State publisher/subscriber graph를 빠르게 만들 수 있습니다.
1
Tools > Robotics > ROS 2 OmniGraphs > JointStates
직접 graph를 구성하면 노드의 역할을 이해하기 쉽고, shortcut을 쓰면 반복 설정 시간을 줄일 수 있습니다. 처음에는 직접 구성해보고, 이후 같은 구조를 반복할 때 shortcut을 쓰는 방식이 좋습니다.
7. 정리하며
Joint control graph의 핵심은 ROS2 topic과 Isaac Sim articulation을 양방향으로 연결하는 것입니다.
1
2
3
4
5
6
7
8
Franka articulation
  -> ROS2 Publish Joint State
  -> /joint_states

/joint_command
  -> ROS2 Subscribe Joint State
  -> Articulation Controller
  -> Franka articulation
이 구조를 이해해두면 Franka뿐 아니라 다른 manipulator나 robot joint에도 같은 방식으로 ROS2 joint command 제어를 붙일 수 있습니다. 결국 Isaac Sim 쪽 articulation target만 정확히 잡으면, ROS2에서는 표준 joint state와 joint command topic 흐름으로 다룰 수 있습니다.