Isaac Sim Tutorial 5. ROS2 Publish Rate and QoS
Isaac Sim ROS2 OmniGraph에서 publish rate를 조정하고 QoS profile과 static publisher를 설정하는 흐름을 정리한다.
이 글은 TurtleBot ROS2 연결, ROS2 Cameras, RTX Lidar Sensors, TF Trees and Odometry에 이어서 ROS2 topic의 publish rate와 QoS를 조정하는 과정을 정리합니다.
앞선 글들에서는 topic을 “나오게 만드는 것”에 집중했습니다. 이번 글의 목표는 한 단계 더 나아가, topic이 얼마나 자주 publish되는지와 subscriber가 어떤 조건으로 message를 받는지를 Isaac Sim OmniGraph에서 조정하는 것입니다.
참고한 자료는 아래와 같습니다.
1. Publish Rate가 Simulation Rate에 묶이는 이유
지금까지 만든 ROS2 OmniGraph는 대부분 On Playback Tick에서 시작했습니다. 이 tick은 simulation frame마다 한 번 실행되므로, downstream node의 publish 주기도 기본적으로 simulation rate의 영향을 받습니다.
예를 들어 simulation이 60 FPS로 돌고 publisher가 매 tick 실행되면 topic도 대략 60 Hz에 가깝게 publish됩니다. publish 주기를 낮추려면 graph tick 자체를 줄이거나, sensor helper의 frame skip 값을 조정해야 합니다.
즉, publish rate 조절은 크게 두 방식으로 볼 수 있습니다.
- graph 실행 빈도를 줄인다.
- sensor helper가 실제 publish하는 frame을 건너뛰게 한다.
2. Isaac Simulation Gate로 IMU Publish Rate 줄이기
먼저 TurtleBot의 IMU link 아래에 IMU sensor를 추가합니다.
1
/World/turtlebot3_burger/base_footprint/base_link/imu_link
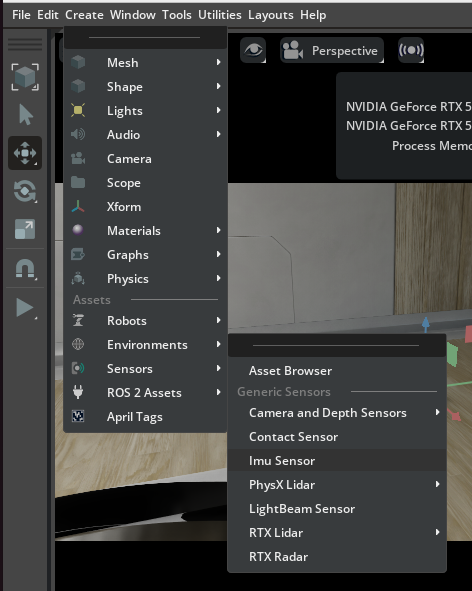
그 다음 같은 prim 아래에 Action Graph를 만들고 Isaac Simulation Gate 노드를 추가합니다. 이 노드는 입력 tick을 일정 frame 간격으로만 통과시켜줍니다.
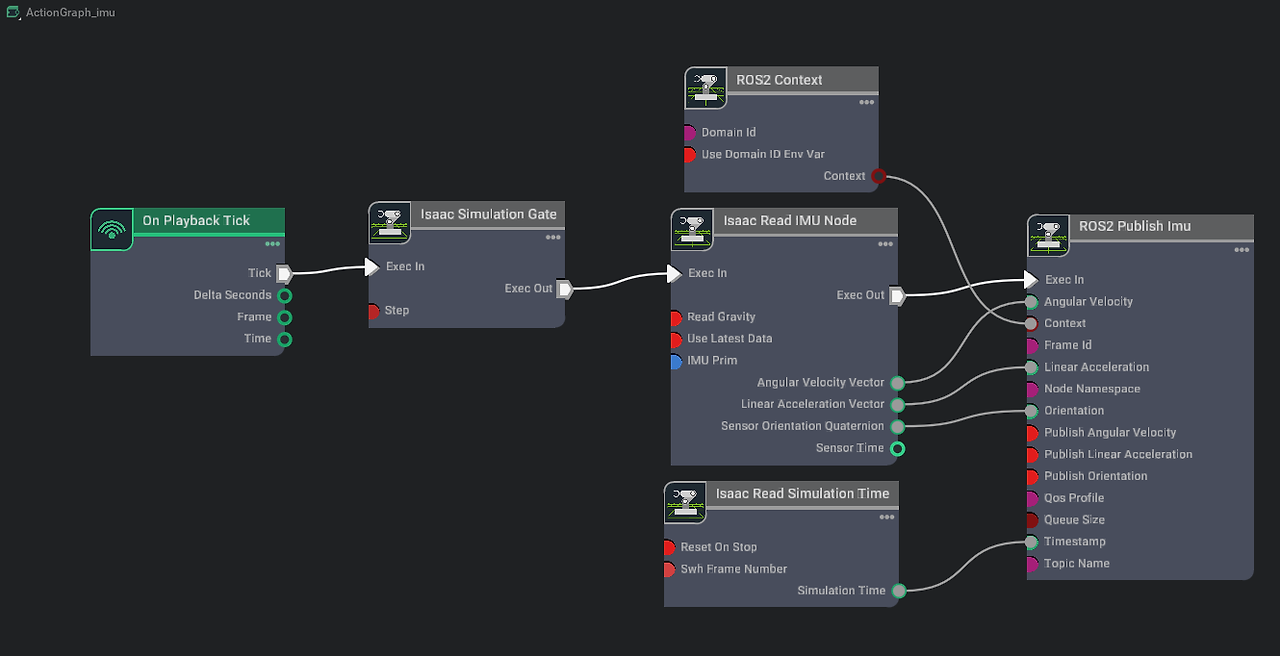
핵심 설정은 다음과 같습니다.
Isaac Simulation Gate의step을2로 설정합니다.Isaac Read IMU노드의 target에는 추가한 IMU sensor prim을 넣습니다.ROS2 Publish Imu의frameId는 IMU가 붙어 있는 link 이름으로 맞춥니다. 예를 들어 namespace가 붙어 있다면a__namespace_imu_link처럼 맞춰줍니다.
step이 2면 downstream node가 두 frame마다 한 번씩 실행됩니다. simulation이 60 FPS라면 IMU publish rate는 대략 30 Hz가 됩니다.
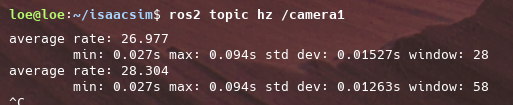
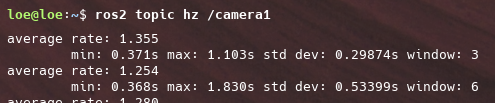
3. topic hz로 확인
host 터미널에서 topic rate를 확인합니다.
1
ros2 topic hz /imu
step을 4로 둔 경우와 2로 둔 경우의 topic hz가 다르게 나옵니다.
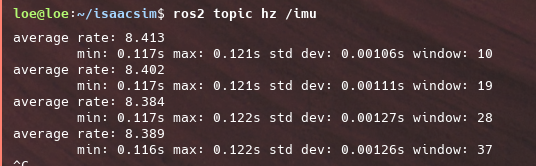
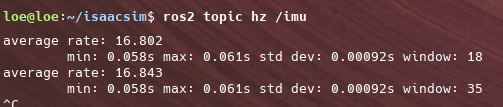
정리하면 Isaac Simulation Gate의 step은 simulation frame 기준 divider처럼 생각하면 됩니다.
1
publish rate = simulation rate / step
실제 측정값은 PC 성능, simulation load, ROS2 통신 상태에 따라 조금 흔들릴 수 있습니다. 그래서 설정 후에는 항상 ros2 topic hz로 확인하는 습관이 좋습니다.
4. Camera와 Lidar Helper의 Frame Skip
camera와 RTX Lidar처럼 sensor helper를 사용하는 경우에는 helper node의 속성에서 publish rate를 낮출 수 있습니다. camera helper에서는 frameSkipCount를 조정합니다.
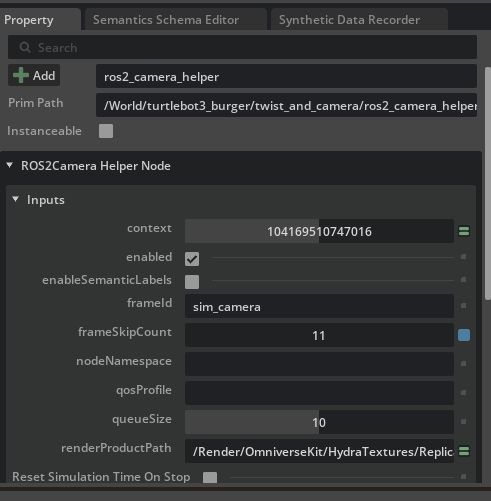

frameSkipCount를 11로 두면 12 frame마다 한 번 publish됩니다. 즉, 60 FPS 기준으로는 대략 5 Hz가 됩니다.
sensor data가 너무 자주 publish되어 RViz2나 network가 버거울 때는 이 방식이 가장 간단합니다. 특히 image, point cloud처럼 message 크기가 큰 topic은 publish rate를 낮추는 것만으로도 체감 차이가 큽니다.
5. Simulation Rate 자체 변경
전체 simulation rate를 변경하고 싶다면 Window > Script Editor에서 Python script를 실행합니다.

아래 설정은 app run loop의 rate limit과 simulation minimum frame rate를 60 FPS로 맞춥니다.
1
2
3
4
5
6
7
import carb

physics_rate = 60
carb_settings = carb.settings.get_settings()
carb_settings.set_bool("/app/runLoops/main/rateLimitEnabled", True)
carb_settings.set_int("/app/runLoops/main/rateLimitFrequency", int(physics_rate))
carb_settings.set_int("/persistent/simulation/minFrameRate", int(physics_rate))
stage timing까지 함께 맞추려면 stage가 load된 뒤 timeline을 멈추고 time code와 target framerate를 설정합니다.
1
2
3
4
5
6
7
8
9
10
import omni

physics_rate = 60
timeline = omni.timeline.get_timeline_interface()
stage = omni.usd.get_context().get_stage()

timeline.stop()
stage.SetTimeCodesPerSecond(physics_rate)
timeline.set_target_framerate(physics_rate)
timeline.play()
simulation rate를 바꾸면 모든 tick 기반 graph의 실행 빈도에도 영향을 줄 수 있습니다. 따라서 특정 sensor만 줄이고 싶다면 Isaac Simulation Gate나 frameSkipCount를 먼저 보는 편이 안전합니다.
6. ROS2 QoS 기본 개념
QoS는 ROS2 publisher와 subscriber가 message를 주고받는 방식을 정하는 정책 묶음입니다. sensor topic처럼 손실을 조금 감수하고 최신 data가 중요한 경우와, 설정값처럼 늦게 붙은 subscriber도 반드시 받아야 하는 경우는 서로 다른 QoS가 필요합니다.
자주 보는 정책은 아래와 같습니다.
| 정책 | 의미 |
|---|---|
| History | message를 얼마나 보관할지 정합니다. keepLast와 keepAll이 있습니다. |
| Depth | keepLast일 때 queue에 보관할 최대 message 개수입니다. |
| Reliability | bestEffort는 빠르지만 손실 가능성이 있고, reliable은 전달 보장을 우선합니다. |
| Durability | volatile은 새 subscriber에게 과거 message를 주지 않고, transientLocal은 publisher가 보관한 message를 나중에 연결된 subscriber에게도 줍니다. |
실전에서는 sensor data는 bestEffort 계열을 쓰는 경우가 많고, 설정값이나 static message는 transientLocal이 필요한 경우가 있습니다.
7. Generic Publisher에 QoS 연결
QoS를 확인하기 위해 Generic Publisher graph를 만듭니다.
1
Tools > Robotics > ROS 2 OmniGraphs > Generic Publisher
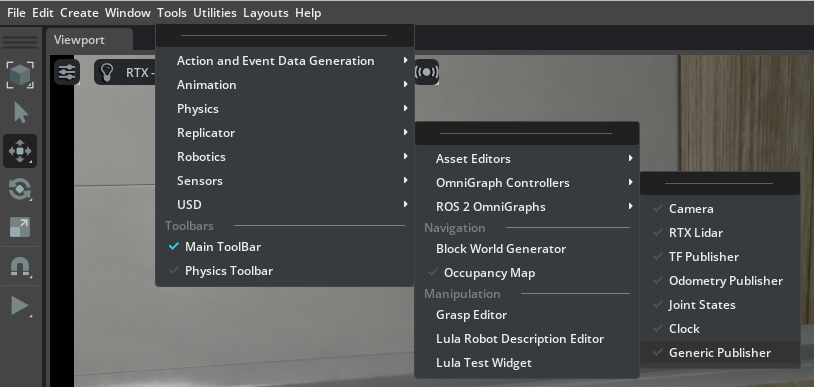
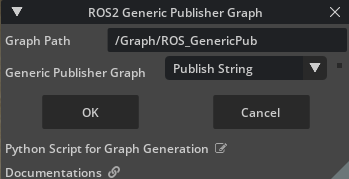
생성된 graph에서 publisher type을 string publish로 바꾸고, QoS profile을 연결합니다.
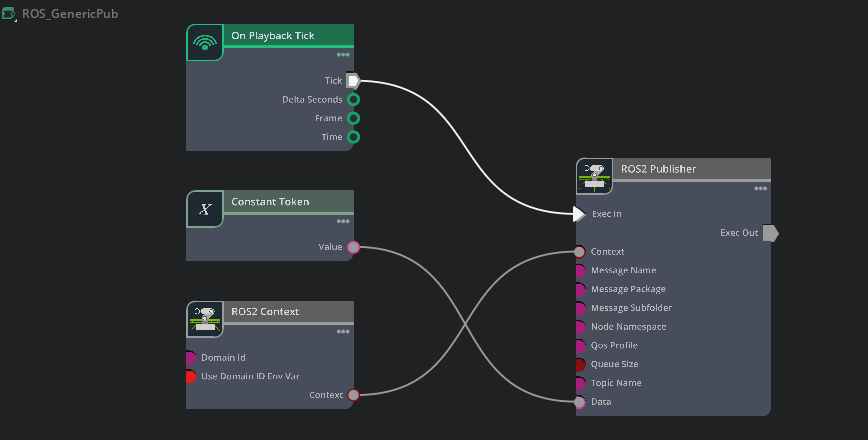
ROS2 Publisher는 QoS를 JSON 형태로 받을 수 있습니다. depth는 양수여야 하고, deadline, lifespan, leaseDuration은 float 형태로 넣어야 유효하게 인식됩니다.
1
2
3
4
5
6
7
8
9
10
{
  "history": "keepLast",
  "depth": 10,
  "reliability": "reliable",
  "durability": "volatile",
  "deadline": 0.0,
  "lifespan": 0.0,
  "liveliness": "systemDefault",
  "leaseDuration": 0.0
}
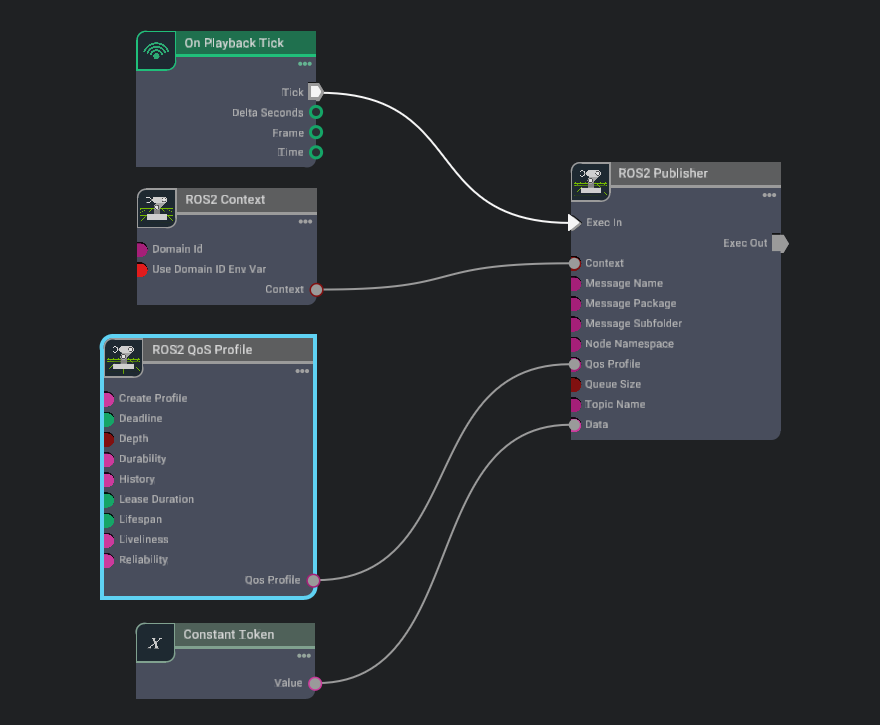
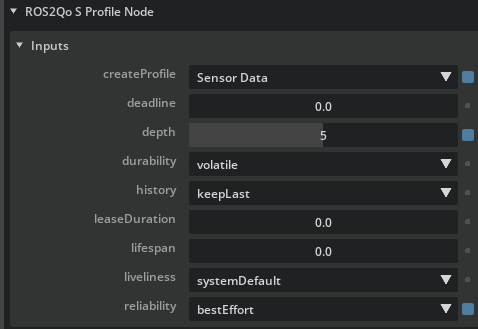
ROS2 QoS Profile 노드를 publisher에 연결하면 node UI에서 profile을 선택할 수 있습니다. sensor data라면 createProfile을 sensor data 계열로 맞춥니다.
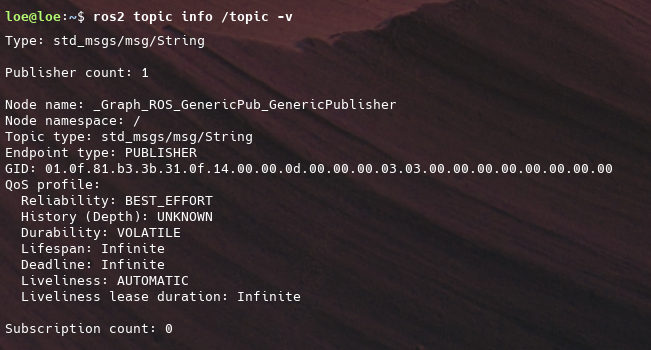
topic의 실제 QoS는 아래 명령으로 확인합니다.
1
ros2 topic info /topic --verbose
8. Static Publisher 만들기
static publisher는 message를 반복해서 publish하기보다 한 번 publish하고, 새 subscriber가 나중에 붙어도 그 값을 받을 수 있게 만드는 패턴입니다. 초기 설정값, map metadata, 변하지 않는 상태값처럼 “늦게 들어와도 알아야 하는 값”에 어울립니다.
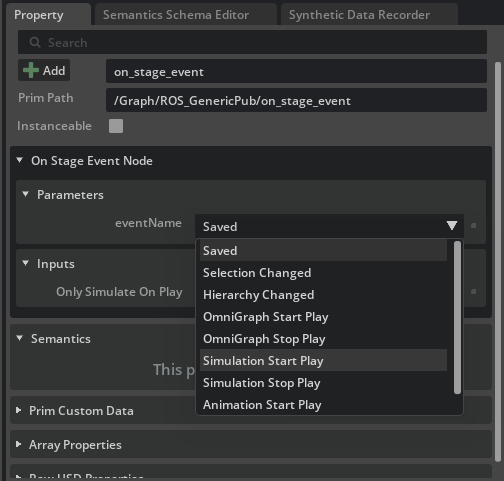
새 graph를 만들고 On Playback Tick 대신 On Stage Event를 사용합니다.
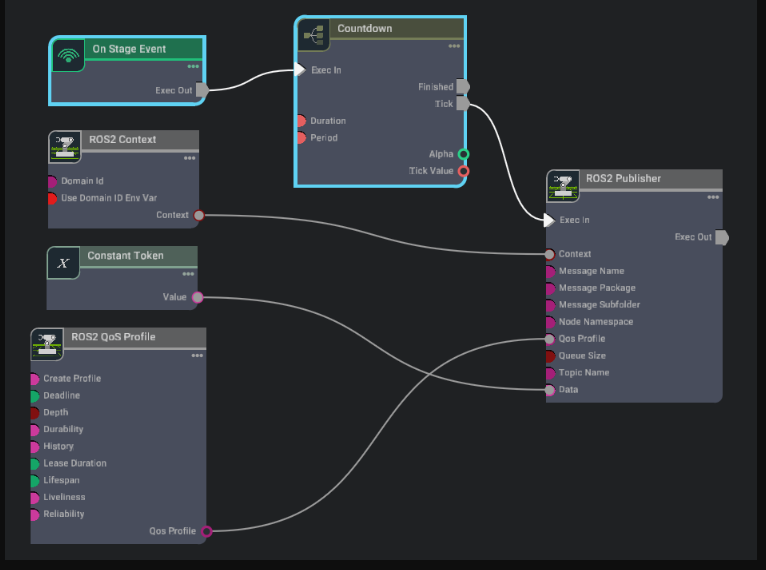
설정 흐름은 다음과 같습니다.
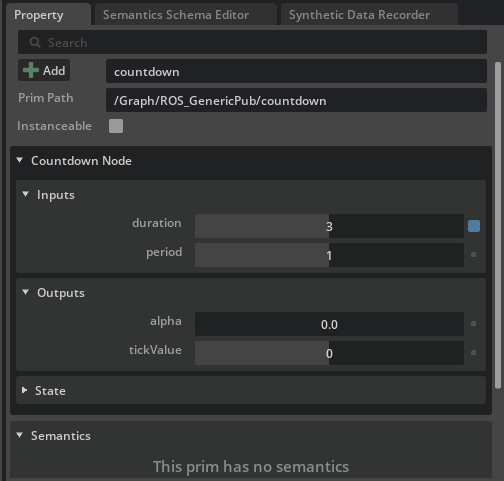
On Stage Event의 event name을 simulation start play로 설정합니다.Countdown노드의 input duration을3, period를1로 설정해 simulation 시작 후 3 frame 뒤 publisher에 tick이 들어가게 합니다.ROS2 QoS Profile은 publisher/subscriber default 계열로 두고, depth를1, durability를transientLocal로 설정합니다.
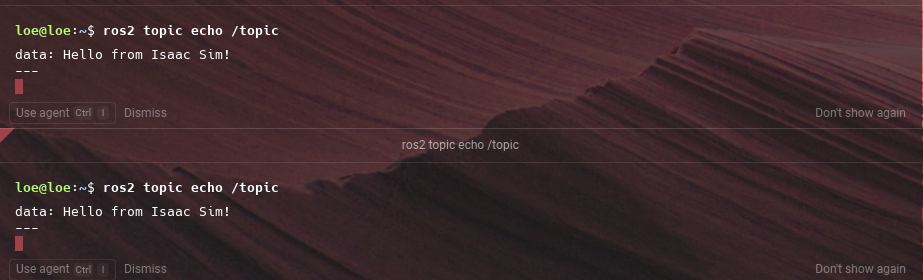
한 터미널에서 topic을 확인한 뒤, 다른 터미널에서 다시 구독해도 같은 message가 들어오면 transientLocal 설정이 제대로 적용된 것입니다.
1
ros2 topic echo /topic
9. 정리하며
publish rate와 QoS는 topic이 “보이게 만드는 것” 다음 단계의 튜닝입니다.
1
2
3
4
5
6
7
8
9
publish rate:
  On Playback Tick
  -> Isaac Simulation Gate or frameSkipCount
  -> desired topic hz

QoS:
  ROS2 QoS Profile
  -> reliability / durability / depth
  -> subscriber behavior
센서 topic은 필요 이상으로 높은 rate를 줄이고, 중요한 상태값은 transientLocal 같은 durability를 써서 늦게 붙은 subscriber도 받을 수 있게 만드는 것이 핵심입니다. 결국 publish rate는 “얼마나 자주 보낼 것인가”, QoS는 “어떤 방식으로 받을 것인가”를 정하는 설정입니다.